Home Blog

How to Fix “Log File C Windows System32 Logfiles SRT SrtTrail TXT”

0
Log File C Windows System32 Logfiles SRT Srttrail TXT

Automatic Repair is a Microsoft-approved solution that may help you fix system startup issues, but it also has the potential to introduce new complications in some situations.

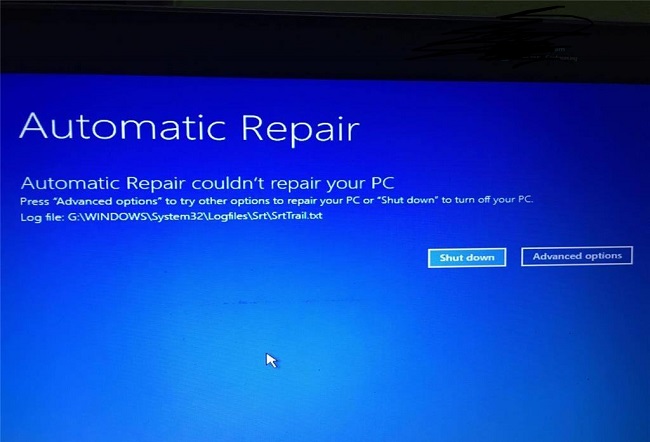
When Windows 10’s auto start repair fails, the error message “log file c windows system32 logfiles srt srttrail txt” occurs in the log file located at C:WindowsSystem32LogfilesSrtsrttrail.txt.

If you get this blue screen of death, your computer will be stuck in an endless cycle that will have a major impact on your productivity until you fix it right away. It’s best to figure out what’s causing this error before attempting a solution to it.

Log File C Windows System32 Logfiles SRT Srttrail TXT

What is the Log File C Windows System32 Logfiles SRT SrtTrail TXT

Automatic repairs are a Microsoft-recommended method for fixing common issues that cause computers to fail to boot. When Windows fails to start, you can rely on the Automatic Repair feature to try to fix the problem without any assistance from the operating system’s developers.

As was mentioned before, there are restrictions and it won’t function in all situations. A c /windows/system32/logfiles/srt/srttrail.txt message appears in the error log. Let’s discuss how to resolve the log file c windows system32 logfiles srt srttrail txt.

How to Fix Log File C Windows System32 Logfiles srt SrtTrail TXT

Many people who use the Windows 11/10 operating system have tried startup repair in hope of fixing the problem. The company has released an official tool to deal with this problem.

However, it is common knowledge that neither a government-issued nor a privately-developed instrument will solve every problem.

This article will go over a few options for repairing the log file c windows system32 logfiles srt srttrail txt in Windows 11 using an automated process.

Solution 1: Run the CHKDSK Command

The Check Disk (CHKDSK) capability is one of Windows’ most useful tools. It allows Windows to perform a check for hard drive issues even as the repair software is being executed.

If the hard disk experiences a problem that is not due to physical damage, this can be a lifesaver. Please use the following procedures to execute the CHKDISK command:

Step 1: You can open the administrative command prompt by pressing the Windows Key + X.

Step 2: When prompted, enter CHKDSK followed by the drive letter.

Step 3: Select the C drive and press Enter to fix any problems with Windows.

Step 4: If you want to check something after the properties windows have appeared, go to the “Tools” tab and select “Check.”

Step 5: Everything is alright may be a message you encounter occasionally. When choosing the “Scan drive” option, you can safely disregard the same.

Step 6: In the end, the scan will be successful, and a message will appear.

Solution 2: Repair the Corrupt Windows Registry

Fixing a damaged registry is as simple as it gets. The system update readiness command is a good example of a tool that may help you perform the same thing. All erroneous registry entries, manifests, and cabinets can be uncovered, saving time and effort for the computer.

Inaccurate information can be easily replaced by the updated version. Be sure to follow the steps below to repair the registry:

Step 1: If you want to open a command prompt as an administrator, you can do so by pressing the Windows key plus the letter X.

Step 2: Type in these instructions:

DISM.exe /Online /Cleanup-image /Scanhealth

DISM.exe /Online /Cleanup-image /Restorehealth

Solution 3: Refresh or Reset your System

If the SrtTrail.txt error has appeared after a recent Windows update, reinstalling the operating system is your best bet.

Once you have made a restore point for your Windows installation, you may always return back to the system’s original state. Follow these directions carefully to get your computer back to normal:

Step 1: Get in touch with the start menu and look for “Create a restore point.” Click “System Restore” in the first search result.

Step 2: Click Next and then select a previous backup from which to restore.

Step 3: Just hit “Next” and then “Finish” to finish the restoration.

Solution 4: Enable NX Or XD Mode in BIOS

Whether NX, XD, or XN, enabling or disabling the CPU’s execution disabling capability is mostly accomplished through the BIOS, with the intended result being to prohibit the CPU from running specific types of code.

NX is an acronym for “No Execute,” which is the full name of AMD. Execute Disable is an Intel-specific term, thus the abbreviation XD. Errors in Windows 10’s LogfilesSrtSrtTrail.txt can be remedied by switching to NX or XD mode in the computer’s BIOS.

Step 1: To access the BIOS, restart the computer and hit the F2 key.

Step 2: Change to the Advanced menu in the BIOS.

Step 3: In the menu that appears, look for the NX or XD logo and then turn those modes on.

Step 4:  Then you can quit after saving the modifications.

Conclusion

While Windows fails to start—typically when attempting to launch Automatic Repair—it creates a log file called StrTrail.txt. A corrupted Srttrail.txt file in Windows 10 could be the result of a number of factors, including hardware incompatibility, power surges, software damage, etc.

This log file c windows system32 logfiles srt srttrail txt, and deleting it is not expected to cause any problems with your computer.

How To “Show Windows Button on Chromebook”

0
Show Windows Button on Chromebook

Keyboard shortcuts unique to Chromebooks are highlighted; these are not present on standard PC or Mac keyboards. Chromebooks have a unique shortcut for displaying windows.

Chromebooks now use a modified keyboard from Google that deviates slightly from the standard layout of desktop computers. As an example, the F5 key on a regular keyboard has been replaced by the new show windows key.

The purpose and nature of the display windows key will become clear in the following section.

Show Windows Button on Chromebook

What Is the Show Windows Button on Chromebook?

Chromebooks feature a superior user experience and are capable of running the Chrome operating system compared to other work devices and desktops. Chrome’s keyboard differs from those of other products in terms of both the keys it uses and the way they’re laid out.

On a Chromebook, pressing the show windows key will display a list of all currently open windows and applications. A bar will appear at the top of the screen to show the many virtual desktops you have access to.

What Does the Show Windows Button on Chromebook Look Like?

The Show Windows button may be found in the center of your Chromebook’s top row of keys. It’s the sixth button from the left on many Chromebooks. It takes the form of a narrow rectangle with two parallel vertical lines on its right edge.

A common blunder is mistaking the Show Windows button (typically to the left of the menu bar) for the Fullscreen button. A square with two arrows inside represents the Full Screen option. The proximity of the two buttons makes it simple to confuse them.

What Does the Show Windows Button on Chromebook Do?

There are two main functions served by the Show Windows button. The first is its principal function; it displays an overview of all currently active windows on your Chromebook. Modern Chromebooks can run Android apps downloaded from the Google Play Store, so they’re useful for a lot more than just browsing the web.

Therefore, it is possible to simultaneously run multiple programs. A convenient way to move between running programs is to use the Show Windows button, which will expand the view to reveal all of the windows currently visible.

Where Is The Show Windows Button On A Chromebook ?

On the primary row of keys on every Chromebook, you’ll find a show windows button. Specifically, it’s between the “Dim” and “Fullscreen” options. For illustration purposes, see the picture below.

Check out Google’s Chromebook Simulator if you’re curious about the keyboard or Chrome OS in general. If it’s different on your Chromebook, you can always find the setting by looking for this icon, which is standard across all Chromebooks.

It’s possible the key was moved by the manufacturer after you bought the keyboard, but that’s quite improbable.

Conclusion

To the right of the “Show Windows Key On A Chromebook” key is a rectangle with two vertical lines. Find it on your Chromebook’s top row of keys, between the full-screen and brightness down arrows.

Sometimes referred to as the Windows Switcher, Overview, or Launcher key, this shortcut also functions as F5 or Refresh. Learn how to make the most of your Chromebook’s Show Windows key with this comprehensive guide.

Windows Host Process RUNDLL32

0
Windows Host Process RUNDLL32

To load and execute 32-bit DLL files, Windows provides the Rundll32 program. Files of this type contain both data and code, and are frequently shared between different Windows applications.

It can be challenging to determine what caused a notification to appear on one of your workplace computers stating that Rundll32 has ceased operating. There may be an issue with the Rundll32 tool, a faulty DLL, or the program that is trying to use the DLL.

Sometimes, malicious software that attempts to disguise itself as a legitimate Windows process would use a filename that is identical to that of a legitimate system utility, such as the Rundll32 utility.

Windows Host Process RUNDLL32

What is Host Process RUNDLL32

The Windows DLL (dynamic linked library) file launcher, rundll32.exe, is an essential component of Microsoft Windows. For instance, if you’re running a Windows app that requires a DLL, you can use rundll32.exe to make that DLL available to your program.

If you disable rundll32.exe, it’s probable that many features of Windows and many Windows programs won’t work since a Windows DLL library contains code that can be used by more than one program on Windows at the same time.

Why does rundll32.exe Access the Network?

From Austin, Texas, USA, we were able to determine that rundll32.exe communicates with a server that appears to be under Microsoft Corporation’s control via the GlassWire application.

There was no other.exe-related network activity that we could find. We think rundll32.exe communicates with settingsfd-geo.trafficmanager.net. So that you can control how data is sent and received from each of your computer’s clients.

It appears that your DNS server is doing this traffic control so that your computer and programs may function normally.

How to Fix Windows Host Process Rundll32.Exe Errors?

These are the solutions to fix the error windows host process rundll32:

Solution 1: Change Folder Options settings

Step 1: Launch the computer’s Settings menu and choose whether you want to see the menu’s icons in tiny size or large size.

Step 2: Pick out Custom Folder Settings. To modify how File Explorer handles folders, go to View > Folder Options.

Step 3: To permanently disable thumbnail previews and only display icons, select the View tab in the new window that has opened.

Step 4: To save the changes, select Apply then OK.

Step 5: Attempt a system restart to see if it corrects the problem.

Solution 2: Restore to the Previous State

It’s possible that “Windows host process (Rundll32) has ceased working” appeared after you installed new software or installed a new driver. It has been reported that this problem occurs after installing QuickSet, the Realtek audio driver, or Sound Blaster.

So, to solve the issue, you need to revert to the prior condition. It’s possible that removing the following programs will help:

Step 1: To bring up the Run dialog, hit the Windows logo key plus R on your keyboard.

Step 2: Just hit OK after typing appwiz.cpl.

Step 3: Find the most recent program you installed and click “Uninstall” to remove it.

Step 4: Start your machine back up.

Conclusion

When an error appears upon system boot, it might be annoying. When users saw “Windows host process (Rundll32) has ceased operating,” they likely felt this way. There are solutions available if you run into this problem, so don’t panic.

To learn how to resolve the “Rundll32 has stopped” issue on Windows 10, continue reading this post. But first, let’s examine the issue in greater detail to figure out what’s causing it.

How to Fix “Getting Windows Ready Stuck”

0
Getting Windows Ready Stuck

If you turn off your Windows desktop or laptop while the message “Getting Windows ready, Don’t turn off your computer” is still shown, the computer may never boot up. Time passes, yet still nothing happens.

When you try to power on, power down, or restart your computer, you may encounter the “computer stuck on getting windows ready” error. Quit giving this bothersome issue your attention. Let us help you rapidly resolve the “machine stalled on getting windows ready issue” by providing several viable options.

Getting Windows Ready Stuck

How to Fix What is Computer Stuck on Getting Windows Ready

When Windows 10 is upgrading itself, a dialog box titled “Getting Windows ready” will display. That means the updates are either being downloaded or are currently being installed.

If you find yourself stranded here, turn off your internet connection or router as soon as possible. Just give it a few minutes and see if the issue disappears on its own. Follow these methods to fix computer stuck on getting windows ready.

Solution 1: Shut Down Your PC and Power Reset Your Computer

A hard power reset will erase everything from your computer’s memory but won’t harm your files. Helps your computer recover from corruption problems and removes you from the loop of Don’t switch off your PC just yet; Windows is setting up.

Step 1: Despite the presence of a “Getting Ready” screen, power off your computer.

Step 2: Unplug any devices that aren’t essential to your computer’s operation (USB flash drive, external hard drive, headphones, etc.).

Step 3: Turn off your computer by holding down the power button for 30 seconds. (At this point, you should turn off your computer and leave it off.)

Step 4: Disconnect the power cord from your computer.

Step 5: Disconnect the power source (only if you are using a laptop and your laptop battery is removable).

Step 6: Reconnect the power cord and plug the battery back into the machine.

Step 7: Boot up your machine. In case this works, you won’t be able to see the screen.

Solution 2: Delete Problematic Files

If you’ve tried everything else to fix the “Windows is stuck” error but nothing has worked, you might try erasing the troublesome system files.

Step 1: Restart your computer to get the Windows Boot Options screen.

Step 2: Select “Troubleshoot > Advanced Options > Command Prompt” from the Windows Boot Options menu.

Step 3: Navigate to the Windows System32 folder, then the Log Files folder, and finally the SrtTrail.txt file.

Step 4: If you see something that looks like this: If you see the error message “Boot critical file c:\windows\system32\drivers\vsock.sys is corrupt, open the Command Prompt and go to the indicated folder, then delete the file using the Del command.

Solution 3: Run the System File Checker

Windows has a tool called System File Checker (SFC) that can scan for and repair damaged system files. A malfunctioning or crashed operating system could be the result of a missing or corrupt Windows Resource Protection file.

This could also prevent updates from going smoothly. The SFC can be activated in the following ways:

Step 1: Put in your Windows CD and start up your computer.

Step 2: Pick a language and a country. Then, select the Next option.

Step 3: To activate the Repair utility, select “Repair your machine.”

Step 4: In the following screen, under “Choose an option,” select “Troubleshoot.”

Step 5: Select the “Advanced” tab in the next box.

Step 6: To access the command prompt, select the button.

Step 7: Enter “sfc /scannow” as the command. Hit Enter

Step 8: You can put the command prompt to bed once the procedure is complete.

Step 9: Check for the problem after a system restart.

Conclusion

Although Windows 10 is a fantastic operating system, you may be unable to use it if you see the “Getting Windows ready” screen issue. Even Windows 10 computers can have unexpected problems at any time.

Unfortunately, it’s not uncommon for Windows to become stuck on the “Getting Windows ready” page. There are a few things you can do when this problem occurs.

But before we get there, it’s important to discuss the potential immediate reasons of this inaccuracy. This will help you to fix computer stuck on getting windows ready.

How To Get Rid of Activate Windows

0
How To Get Rid of Activate Windows

Everyone has been there, whether they bought a copy of Windows or used a hack to get it for free. Unfortunately, many people’s interactions with computers have been tarnished by the infamous “Activate Windows” watermark.

It could get in the way, humiliate you if you try to record your screen, and divert your attention from the movie or game you’re enjoying. In this article, we will demonstrate how to get rid of activate windows.

How To Get Rid of Activate Windows

What Is the “Activate Windows” Watermark?

Like any other business, Microsoft takes a dim view of its products being stolen, misused, and redistributed without payment. Microsoft has implemented a watermark in the system’s upper-right hand corner unless the user has legally activated Windows 10 in an effort to reduce the prevalence of illegal downloads of the operating system.

Seeing as the watermark doesn’t interfere too much, this may not look like a big deal. It overlays every single open window, app, and even your mouse pointer. Despite the fact that this isn’t a particularly innovative approach to combating piracy, it was nevertheless enough to motivate you to come here in search of a solution.

But don’t worry; we have prepared some strategies to assist people who do not wish to spend money removing the watermark, in addition to telling you the obvious remedy. To be clear, most of these solutions only hide the “Activate Windows” watermark but don’t truly activate your PC.

You still won’t be able to remove restrictions like being unable to make any changes to your computer. Now that we have that settled, we can get to work removing the “Activate Windows” watermark from your Windows 10 installation.

How To Get Rid of Activate Windows Watermark

Let’s take a look at how to get rid of activate windows watermark at the bottom of your screen.

Method 1: Using Product Key

When a user buys a legitimate copy of Windows, they receive a product key that can be used to reinstall the operating system on another computer. A valid product key is required to activate Windows using the Control Panel.

Step 1: You should first go to “Settings” (you can get there by pressing Windows + I) and then select “Update & security,” as indicated in the screenshot below.

Step 2: Select “Activation” and then “Change product key,” as shown in the image below.

Step 3: Dialogue box will pop up. Select “Next” after entering the product key.

Once you’ve located Windows 10 and installed it on your device, restarting will remove the Activate Windows Watermark message.

Method 2: Using Ease of Access

The Ease of Access center is a Windows feature that enables the user to make accessibility modifications to the operating system.

However, the feature is inaccessible unless the user already possesses the necessary background information. To learn how to get rid of the Activate Windows watermark, please read the instructions below.

Step 1: Type “Ease of Access Center” into the search bar or open Settings by pressing “Windows+I” on the keyboard.

Step 2: A dialogue window will pop up. To make the computer more legible, select the corresponding option.

Step 3: Click the “Remove background images (where available)” checkbox, then “Apply,” and finally “OK.”

If you follow the procedures above, the Windows Activation Watermark will no longer appear.

Method 3: Disabling Windows 10 Tips

Turning off system suggestions in Windows 10 will prevent this issue from occurring. Turning off Windows 10’s helpful hints is as easy as following the steps below.

Step 1: First, you can access this window by going to the Start menu and typing “Windows + I,” which will bring up a window similar to the one shown in the image below. Pick the “System” option.

Step 2: Follow the steps in the image below to disable the slider labeled “Get tips, tricks, and suggestions as you use Windows” and the one below it in Step 2: “Notification & action.”

To resolve this issue, the system will now disable the Windows hints and suggestions.

Method 4: Using Script

It is possible to ignore this warning if you create a script, save it as a batch file, and then run it with the Administrator privileges. To complete this activity, please refer to the steps outlined below:

Step 1: Press the Windows key and type “Notepad” into the search bar.

Step 2: Copy and paste the content displayed in the image below into the file.

Step 3: Exiting the Explorer application using the parameters

“@echo off
taskkill /F /IM explorer.exe
explorer.exe
exit”

Step 4: Make sure to select “Active” when saving the file.

Step 5: Filename.bat, then click the “All Files” button,

Step 6: Find the file you want to run as an administrator, then right-click on it and select “Run as Administrator.”

Simply restarting your computer will remove the Activate Windows watermark.

Conclusion

This post will show you how to get rid of the Active Windows watermark on your computer without a product key license until you activate the product license key. Remove the watermark from your work by activating the license key or purchasing a digital organization license.

If you find an image with a watermark like the one below and wish to have it removed, what would you do? In such case, you’ll want to read this article. Take out the desktop watermark with your tool.

There Was a Problem Starting C Windows System32 Logilda DLL

0
There Was a Problem Starting C Windows System32 Logilda DLL

It’s common for Windows 10 devices to display error messages there was a problem starting c windows system32 logilda dll shortly after powering on, resuming from sleep, or restarting.

Sometimes, after a Windows 10 device has been activated and made useable for a few minutes, the user will see the LogiLDA.dll warning pop up if the computer is particularly old or has multiple processes going at once.

There Was a Problem Starting C Windows System32 Logilda DLL

Solved: “There Was a Problem StartingWindows System32 logiLDA.dll” Error

Windows 10 desktops, laptops, and tablets are the primary target audience for this issue and its fixes. However, users of Windows 7 or Windows 8.1 may find this article helpful. there was a problem starting c windows system32 logilda dll errors manifest similarly and have same fixes across these OSes.

Method 1. Restore the LogiLDA.dll File

Unfortunately, DLL files are vulnerable to corruption, disappearing, and deletion. There are a plethora of resources online to assist you locate, download, and install a new.dll file. To resolve the issue, get the LogiLDA.dll file from a reliable download site.

Do not download.dll files unless you are sure of the lawfulness of doing so in your jurisdiction. The DMCA and similar rules make it risky to acquire DLL files from a third-party website in many countries, including the United States.

Step 1: Open up dll-files.com in your preferred web browser. If you need to download some DLLs, you should only utilize this site.

Step 2: Find the LogiLDA.dll file and click the download button. Verify the system’s architecture and version before proceeding. To start the download, select the button.

Step 3: Make use of this manual to set up your PC with the LogiLDA.dll correctly.

Method 2. Remove Logitech Download Assistant From Startup

Disabling the Logitech Download Assistant at boot time is an alternative solution to this problem. Remember that after attempting this method, you will have to actively seek out updated Logitech drivers and software.

Step 1: If you right-click a blank area of your taskbar, you can access the computer’s task management system.

Step 2: If the Task Manager opens in a stripped-down view, you can reveal additional information by selecting the “Mode details” option.

Step 3: Go to the Startup menu. Select “Disable” from the menu that appears when you right-click the Logitech Download Assistant.

Step 4: The best way to see if the error has been fixed is to restart your computer.

Method 3. Make a Registry Edit

If the problem persists even after you have prevented the Logitech Download Assistant from starting with the computer, you may need to erase the appropriate key from the Registry. Here are the measures you should take to do this.

Step 1: Select the magnifying glass icon in the taskbar to activate the search function. Use the Windows key plus the letter S to open it up quickly.

Step 2: Just use the search bar to look up “regedit” or “Registry Editor,” and then open the result.

Step 3: To access the following Registry key, either use the Navigation pane to select it or type its path into the address bar and press Enter.

HKEY_LOCAL_MACHINE\Software\Microsoft\Windows\CurrentVersion\Run

Step 4: To remove Logitech Download Assistant, right-click it and choose “Delete” from the menu. In doing so, the corresponding Registry key will be deleted.

Step 5: When prompted, select Yes on the popup window. Verify that the.dll error reappears after a system reboot.

Conclusion

When utilizing Logitech products on a Windows PC, you may encounter the LogiLDA.dll problem messages. It might be anything, from a mouse and keyboard to a webcam and microphone. When an error occurs, it typically appears as “there was a problem starting c windows system32 logilda dll’.

There was a problem locating the required component, “or a variant that is very similar. There may not be a concrete answer as to what triggers LogiLDA.dll, however educated suggestions can be made.

Common causes include problems with a Logitech software, Windows updates, and the accidental deletion of important files. However, this post will explain certain techniques to get rid of this troublesome problem once and for all, no matter the cause.

How to Fix “Windows Could Not Find a Driver for Your Network Adapter” Error

0
Windows Could Not Find a Driver for Your Network Adapter

Errors such as “windows could not find a driver for your network adapter” displayed by the Windows Network troubleshooter indicate a mismatch between your PC’s operating system and network driver.

Your computer’s Ethernet or Wi-Fi device driver and Windows are unable to establish a connection. If your computer has an outdated or corrupt network device driver, the troubleshooter may show you the error.

This issue might also be brought on by the power management settings of your network adapter. The issue is simple to resolve, and we expect that the steps outlined below will have you back online in no time.

Windows Could Not Find a Driver for Your Network Adapter

Solutions to Fix “Windows Could Not Find a Driver for Your Network Adapter” Error

One of the new features in Windows 11 is a troubleshooter for network adapters, which may be used to identify and fix common network problems.

The error message “Windows could not identify a driver for your network device” can leave you perplexed even though the troubleshooter generally does its job well.

Solution 1: Enable the Network Adapter

If your computer’s network adapter is deactivated or switched off, the Network troubleshooter may not function properly. In order to see what kind of shape your network adapter is in, do the following:

Step 1: When you press the Windows key, put control panel into the search field, and then click Open, you’ll be taken to the Control Panel.

Step 2: Pick the Connection Type and Internet.

Step 3: Choose the Sharing Center and Network Connections option.

Step 4: To alter your adapter’s settings, click the corresponding button on the menu bar.

Step 5: Determine which network adapter or device Windows is unable to find a driver for.

Step 6: If the network adapter icon is grayed out, it is not active. To reactivate the adapter, right-click it and pick the Enable option.

Step 7: If “Windows could not find a driver for your network adapter” keeps popping up on your computer, try updating your network driver.

Solution 2: Update Your Network Driver

Maintaining up-to-date device drivers is always a smart idea. You may enhance your network’s performance and eliminate any issues with your adapter by updating your PC’s network driver.

If you’re using a computer running Windows 10 or Windows 11, here are the steps you need to do to update the network drivers.

Step 1: To access the Run dialog box, use the Windows key in conjunction with the letter R. In the dialogue box, type devmgmt.msc and hit Enter (or select OK).

Step 2: To do so, open the “Network adapters” submenu, right-click the Ethernet or wireless adapter, and then select Update driver.

Step 3: Just click the box labeled Automatically search for driver updates. If there is a newer version of the adapter available, Device Manager will look for it on the web and in Windows Update.

Because of this, you should only choose this option if your computer has access to the internet. For a hands-on driver installation experience, use the “Browse my computer for drivers” option. If your computer’s network adapter needs updating, head over to the maker’s webpage for the most recent version.

Solution 3: Change the Network Adapter Driver Power Management Settings

If Windows detects that a device or background process is using too much power, it may temporarily suspend it to preserve battery life.

Step 1: In order to view the driver’s properties, launch Device Manager, expand the “Network adapters” section, right-click the offending device, and select Properties.

Step 2: To disable, uncheck the boxes under Power Management. Let the computer power down this gadget automatically. In order to permanently store the new power level, click OK.

Solution 4: Perform a System Restore

If the problem only appeared recently and none of the above solutions worked, try reverting your computer to an earlier point in time. By reverting back to a previous system state, you can get rid of any software or drivers that you may have installed recently that are incompatible with your network card’s driver.

To utilize Windows System Restore, you must first turn on System Protection on your local disk. Since Windows can now build restore points on its own, you may rest assured that your system will be protected from any unintended changes.

Check out our how-to on making a system restore point in Windows if you need more knowledge. If Windows is unable to recognize your network adapter driver, you can roll back your system using the procedures below.

Step 1: To make a system restore point, click the Start button, then type system restore into the search bar.

Step 2: Click the “System Restore” button.

Step 3: If you want to roll back recent modifications to your PC (such as software installations, driver updates, OS upgrades, etc.), choose the “Recommend restore” option.

Step 4:  Windows will display the date and time that the restore point was made. To begin the system restore, click Next and then continue as instructed.

Conclusion

When the computer is unable to locate and interact with the driver that is designed to link the OS and the networking hardware, the message “Windows could not find a driver for your network adapter” is displayed.

Most commonly, this issue occurs when attempting to fix a malfunctioning network adapter via the troubleshooter. To help you out, we have compiled a list of all the potential solutions to this problem. The first one should be tackled first, and so forth.

Fix: We Can’t Activate Windows on this Device as We Can’t Connect to Your Organization Activation Server

0
We Can't Activate Windows on this Device as We Can't Connect to Your Organization Activation Server

If you’ve just upgraded to Windows 11 or 10 or switched to a new PC, you may have encountered an error during the Windows Activation process. The Windows Activation server has a problem validating or recognizing the associated digital account’s license, which is causing this issue.

The activation error in a company is the topic of today’s post. We were unable to connect to your organization’s server and hence are unable to activate Windows on this device, error code 0x8007007B.

Without being able to connect to your company’s server, we can’t activate windows on this device as we can’t connect to your organization activation server.

We Can't Activate Windows on this Device as We Can't Connect to Your Organization Activation Server

What is We Can’t Activate Windows on This Device as We Can’t Connect to Your Organization Activation Server

KMS licensing is used by businesses to activate a number of computers (Key Management Server). The activation of a computer by this method is temporary. Instead, they should maintain contact with the company once every seven months (or 180 days).

Pro and Enterprise editions are the norm, and these tend to be installed on hundreds or thousands of PCs at once. Consider an employee who uses a PC at work and then quits; he takes the Windows Key with him.

The aforementioned strategy prevents this from happening. The usage of an organization key is another potential cause for this error message. Later, an incompatible change was made to the PC’s operating system, either through an upgrade or a downgrade.

Methods to Fix We Can’t Activate Windows on this Device As We Can’t Connect To Your Organization Activation Server

First, we need to figure out what this message means and why it keeps appearing before we can start fixing it. Therefore, if you’re using a company-issued Windows computer, you might see this notification.

We make use of volume license keys in our company. This means that its many systems are activated with the help of temporary keys. Thus, there are situations when the computer may show this error message, leading to an inactive Windows PC.

Several options are provided below to help you address this problem. These methods will help you to fix we can’t activate windows on this device as we can’t connect to your organization activation server. 

Method 1: Connect the System to the Internet

Connecting the machine to the internet is recommended because these activate using volume license keys and need to be checked at least twice a year. Additionally, you’ll need to provide a command to check that it’s still functional.

Step 1: Once everything is linked, open a new Command Prompt window.

Step 2: Simply press the Windows and R keys together to open the Run dialog.

Step 3: Just press the Enter> key after typing cmd.

Step 4: Simply open a Command Prompt window and enter slmgr.vbs /dlv.

Step 5: Get ready to press the enter key.

Step 6: The channel and product key are now displayed as GVLK.

Step 7: Once the system has been activated with the volume license key, the above channel will be displayed, and the error warning will disappear.

Method 2: Enter a Product Key

In the event that the aforementioned activation procedure fails to work on your computer, you may always buy a product key. They are available for purchase directly from the Microsoft online store.

It is also possible to activate a system by using the product key, which can be found on the product’s box or in the user’s handbook. Those who have been handed a laptop by the company should inquire with upper management about obtaining a copy of the laptop’s key.

Step 1: To access the Windows PC’s configuration menu, click the “Settings” icon.

Step 2: Go ahead and select System, and then after a little scroll, you’ll find Activation.

Step 3: Select the Change Product key menu item here.

Step 4: You can now enter the new product key that you have purchased or found in your shipments by clicking the Change button.

Step 5: Doing so will activate the system and remove the activation prompt.

Method 3: Run the Troubleshooter

Windows is notorious for having a plethora of bugs. It’s also conceivable that the activation service is incorrectly reporting that your system isn’t activated due to a bug. Invoking the diagnostic tools will swiftly resolve the problem.

Step 1: Start Windows’ Settings program and navigate to the System subheading.

Step 2: When you get to the System page, scroll down and click Activation.

Step 3: The Troubleshoot link can be found on the Activation page. You should really click it.

Step 4: To use the troubleshooter, simply follow the on-screen prompts.

Step 5: Only if your copy of Windows isn’t activated will you see the troubleshoot option on the Activation screen.

Step 6: As soon as the problem has been fixed, the notification will be removed from the Activation page.

Conclusion

When upgrading to Windows 10, customers often have issues with Windows Activation. The Windows Activation server is at fault, as it is unable to verify or identify the associated license. This issue occurs on systems that were licensed via the Key Management Server.

Multiple computers in an organization can be activated using this method. There is no permanent activation for such devices; rather, they must be linked to the network once every 7 months or 180 days.

The preceding procedure ensures that former employees who brought their own computers to the office will not take their activated Windows Keys with them.

It’s also possible to encounter this problem if you installed Windows using a product key issued to your business but then downgraded or upgraded your PC to a version that doesn’t work with the key you originally used.

Hope this guide was helpful to fix we can’t activate windows on this device as we can’t connect to your organization activation server.

How To Fix “Windows Cannot Be Installed To This Disk GPT” Error

0
Windows Cannot Be Installed To This Disk GPT

The process of reinstalling Windows can be lengthy and difficult. While some users may breeze through the procedure without so much as a warning light, others will likely run across issues that will require intervention.

While many issues may prevent Windows from being installed to disk, the following are the most prevalent. Fortunately, there are solutions to these issues that allow the Windows installation to proceed.

Whether you’re having trouble with the partition style or trying to migrate Windows to a brand-new solid-state drive, we can assist you.

Windows Cannot Be Installed To This Disk GPT

Solutions to Error ‘Windows Cannot Be Installed to This Disk GPT’

As the underlying causes of the errors are fixed, all machines will eventually use either UEFI or BIOS to start up. If your PC has the UEFI firmware, you must use a GPT drive to install Windows.

Similarly, if your PC boots from a BIOS, you’ll need to use an MBR disk to install Windows. That’s because GPT isn’t supported by legacy BIOS, which is why you’re getting an error message “windows cannot be installed to this disk GPT”. Now that we know what’s going on, fixing the problem is a breeze.

Method 1. Convert MBR to GPT Without Losing Data

In order to start Windows in UEFI mode, which is what the error message suggests, the system drive must have a GPT partition style. To fix “The selected disk is of the GPT partition style,” just convert the MBR disk to GPT.

We recommend using EaseUS Partition Master, a robust third-party partition program that transforms MBR to GPT without compromising data, as the means by which to perform this conversion.

Step 1: Get EaseUS Partition Master from their website and install it on your PC.

Step 2: Launch Disk Converter and then to choose “Convert MBR to GPT” and then to click “Next.”

Step 3: Decide which MBR disk you want to convert to GPT, and then click the “Convert” button.

Method 2. Convert MBR to GPT by Reformatting the Drive

In order to convert the drive to GPT and install Windows, you will need a Windows installation disc or USB. However, you’ll have to format the drive by hand and switch it to GPT mode if you go this route.

All of the information on the drive will be lost if you reformat it. Therefore, if the information is important to you, use EaseUS Partition Master to do the conversion to GPT and keep the data intact. Or at least make a complete backup before performing the reformatting.

Step 1: Shut down your computer and insert the Windows installation disc or flash drive.

Step 2: Start up the computer using the disc or stick.

Step 3: Launch Command Prompt by pressing “Shift + F10” while in Windows Setup.

Step 4: Type each of these commands in sequence:

  • diskpart
  • list disk
  • select disk
  • clean
  • convert gpt
  • exit

Step 5: Exit the Command Prompt.

Step 6: Keep on installing Windows.

After the process is complete, the drive will seem as a continuous free space. Select the free slot, then continue. Instead of sending the same error, Windows will begin the installation.

Method 3. Boot to UEFI Mode

This is not a generalizable fix. Why? This is due to the fact that not all PCs’ firmware is compatible with both UEFI and BIOS. Even though most Windows 10 PCs and laptops use UEFI-based motherboards with legacy BIOS-compatibility mode.

There are still some requirements and expectations users should keep in mind. The current Surface Pro only supports UEFI mode, whereas older devices running Windows 7 can only use the ancient BIOS mode.

Step 1: Power down your machine entirely.

Step 2: Turning the system on is the second step. After the boot logo appears, press the key designated for entering the BIOS (often Esc, Delete, F1, F2, F10, F11, or F12). (The BIOS key is usually displayed on the screen.)

Step 3: Navigate to the “Boot” menu using the arrow keys.

Step 4: Click the down arrow till you reach UEFI.

Step 5: Leave BIOS after saving the modifications.

Step 6: Proceed with Windows setup.

Conclusion

We need to know the GPT partition style in order to resolve this issue. The GPT partition style is widely used to store information, including the operating system, on hard drives. When the partition style is selected during disk initialization, only then can the hard drive be used.

This will help you to fix windows cannot be installed to this disk GPT. We refer to the complete hard drive set as a GPT disk. The MBR partition style is the antithesis of the modern GPT partition style.

Most users are still making use of MBR disks despite the fact that it is incompatible with more modern operating systems and has a lower restriction on the number of primary partitions and hard disk storage than GPT.

How To Blur Background in Zoom Windows 10

0
How To Blur Background in Zoom Windows 10

Blurring your background during Zoom meetings is a smart idea whether you need to temporarily shift your office setting or are just trying to safeguard your personal space. However, there are situations when you may suddenly need to switch video conferencing software or restart a session.

When that happens, you might find some strange mistakes in the background. This manual was designed to get you ready for anything.

Here are some tricks on how to blur background in zoom windows 10 sound better and fading out the backdrop. No matter how difficult future gatherings may be for you.

How To Blur Background in Zoom Windows 10

What to Do If Your Blurred Background isn’t Showing Up

The option to blur the background doesn’t always appear during signup. Checking that you’re using the most recent version of Zoom is an easy way to resolve the issue. To see if there have been any changes made to your profile, click the gear icon next to your profile image.

While in most cases this will enough, there have been reports of people needing to restart their machines before the background will activate. Last resort: make sure your computer meets Zoom’s minimum requirements.

Warn you: It may take some time for a blurred backdrop to load. Similarly like any other digital backdrop. As a result, you may be prompted to continue the conference without the background or wait for the latter to load if you transition from one Zoom meeting to another.

If the meeting has to be restarted because the virtual or blurred background is taking too long to load, that is an option.

Avoid Zoom Blurring Out Parts of Yourself

So, be honest. You may achieve a distinct look by using Zoom to blur the background. Most importantly, you can have specific areas of your image blurred. To keep the virtual backdrop from obscuring your face or making you look fuzzy:

Step 1: Examine your camera’s focus to guarantee clear shots.

Step 2: Lenses should be cleaned on a regular basis to ensure optimal performance.

Step 3: The hair, clothes, and skin should stand out from the background as much as possible.

Step 4: One approach is to photograph yourself in a blurry background. This image can then be used as a virtual backdrop during a Zoom call to simulate the blur effect.

Change Zoom Settings to Blur the Background on Windows 10

To mask your Windows 10 desktop before making a Zoom call:

Step 1: You may get started with Zoom by opening the program and signing into your account.

Step 2: Chose the “Settings” gear icon in the upper right hand corner.

Step 3: Choose “Backgrounds & Filters” from the “Settings” menu.

Step 4: Next, choose the “Blur” button, and the background will instantly take on a hazy appearance.

In Windows 10, to mask your surroundings while on a Zoom call:

Step 1: Find the bar at the bottom of the meeting screen. To make it appear, you may need to move your mouse to the bottom of the screen.

Step 2: Find the chevron-shaped “Stop Video” button that points up.

Step 3: Select “Video Settings” > “Backgrounds & Filters” through the arrow.

Step 4: Next, choose the “Blur” button, and the background will instantly take on a hazy appearance.

Change Zoom Settings to Blur the Background Using Mac

You may get started with Zoom by opening the program and signing into your account.

Step 1: Chose the “Settings” gear icon in the upper right hand corner.

Step 2: Choose “Backgrounds & Filters” from the “Settings” menu.

Step 3: The background will instantly seem blurred after you select the “Blur” option.

For a more discreet Zoom call on a Mac:

Step 1: Find the bar at the bottom of the meeting screen. Clicking on the image with your mouse may be required.

Step 2: Find the chevron-shaped “Stop Video” button that points up.

Step 3: Select “Video Settings” > “Backgrounds & Filters” through the arrow.

Step 4: Finally, choose the “Blur” menu item. Instantly, your surroundings will appear hazy.

How to blur Zoom Background on Mac

Step 1: First, launch the desktop version of Zoom and log in.

Step 2: Find your profile photo in the upper right hand corner of the Zoom screen and click it. Just hit the ‘Settings’ button.

Step 3: Go to the bottom of the options page, and select the In Meeting (Advanced) option.

Step 4: Discover a digital setting. To add blue to the virtual backdrop, choose the bubble adjacent to it and click it. Please enable the option to “Allow usage of videos as virtual backdrops.”

Step 5: Initiate the meeting the same way you always have using Zoom.

Step 6: Select Stop Video by pressing the ” key at the bottom of the Zoom screen. Use the “Blur My Background” option.

Conclusion

I don’t think you should blur your background on Zoom, but I had to provide my opinion on anything because this is a lesson on the Zapier app, after all. My kids were watching TV in the living room where my desk is, so I had to hold my recent one-on-one meeting with my manager in the kids’ playroom.

We began talking, and she inquired about the (generous) piece of art that hung behind me. I told her it was a huge mural the kids had drawn that we had up on the wall two years ago and never bothered to take down.

She expressed approval and mentioned that she, too, displayed doodling on her bedroom wall. This guide will let you know how to blur background in zoom windows 10.